Flocks management in the BAT1 software
This tutorial will demonstrate how to manage and track your flocks in the BAT1 software.
Contents
Adding a standard growth curve to the flocks
The basics
Before the weighing is started, a file structure must be created in the scale. Individual files in the scale should correspond to individual houses, pens or cages on your farm. In other words, each group of birds that you need to watch separately should have its own file in the BAT1 scale.
Let’s consider a simple example of a farm that contains only one house, which is divided into two pens with birds:
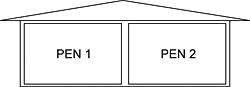
There are two files created in the scale named PEN1 and PEN2, which you use for weighing the birds.
As the birds are weighed every week (or other period) and the data is downloaded to the PC, the database in the BAT1 software is gradually filled with the data from individual weighings:
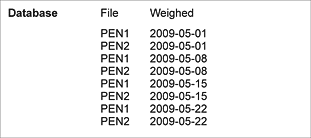
It is pretty easy to find individual weighings in the database, but it is difficult to track each weighing of a flock and watch its progress. Additionally, as the database grows, it is more and more difficult to find what you need quickly.
Flocks
The BAT1 software comes with a flock management system that allows you to define all flocks on your farm and watch their progress.
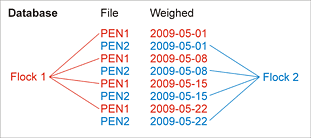
Once the flocks are properly defined in the BAT1 software, the database will be automatically sorted and individual weighings will be included into the appropriate flocks:
The flock management is done in 3 steps:
-
Flock start: when the flock comes to your farm, you create the flock in the BAT1 software. Such a flock is called a Current flock, meaning that the flock is currently present on your farm.
-
Flock life: during the entire time when the flock is present on your farm, you can watch its progress. As the flock is being weighed, the weighing results are automatically included into the flock. The only things you have to do during the flock life are to weigh the birds and download the weighing data to your PC. The weighing data will be sorted to the flocks automatically.
-
Flock end: when the flock is going out from your farm, it needs to be closed in the software. The flock will no longer be monitored and it will be moved to Closed flocks.
There are usually more current flocks at one moment and many closed flocks in the archive. Data from all the flocks are still archived in the database. Even the oldest closed flock can be viewed, compared to other flocks, etc.
The 3 steps of the flock management are explained below in separate chapters.
Flock start
When a new flock comes to your farm, you have to start the flock manually and define 3 parameters in the software:
-
Date of the flock start
-
Initial age of birds in the flock that will match the start date above. This will be 1 for day-old chicks or a higher number for older birds.
-
List of files used in the scale when weighing the flock. This can be only one file if the flock will be weighed using only one file in the scale. If you want to watch progress of a whole house or whole farm, more files can be added to the flock. In such case, weighing data from all files in the flock will be averaged into one total result.
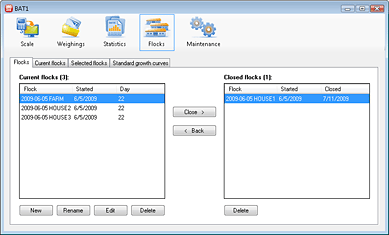
To define a flock in the BAT1 software, click the Flocks icon; the flocks setup panel will be displayed:
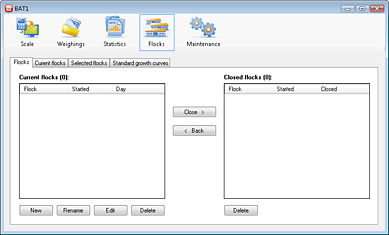
There is a table of current flocks on the left side and a table with all closed flocks on the right side. Both tables are empty, so let’s fill them with some flocks.
We are going to use a farm with 3 houses in our example:
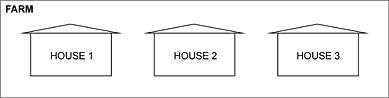
On June 5, 2009, day-old chicks were delivered to all 3 houses and the birds are still present on the farm. We want to watch all 3 houses separately and also a total progress of the whole farm. The birds are weighed using files HOUSE1, HOUSE2 and HOUSE3 in the scale.
We already know parameters of all the flocks, so we can create them in the software. Let’s start with house number 1.
Click the New button to create a new flock. When the question Do you want to use some existing flock as template? displays, click No.
Next dialog will ask for the flock name. Enter 2009-06-05 HOUSE1, which means that the flock started on June 5, 2009 and the birds are located in the first house. You can use a unique flock number instead of date.
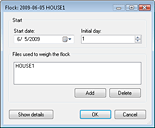
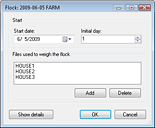
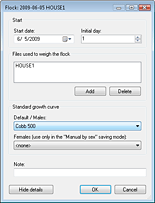
Next, the dialog for entering the flock parameters will be displayed. Fill the following data:
- Start date: June 5, 2009
- Initial day: 1
- Files used to weigh the flock: add file HOUSE1
The dialog should look like this:
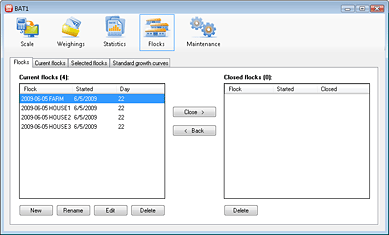
Click OK. The flock will be shown in the Current flocks table:
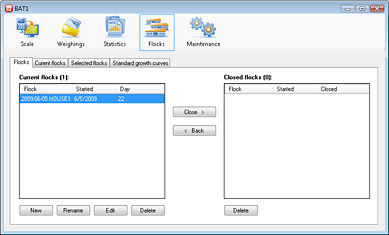
You can see in the table that the flock started on June 5, 2009 and now the birds are 22 days old (it’s June 26 today).
From now on, all weighings of file HOUSE1 weighed after June 5, 2009 will be automatically included into this flock:

Similarly, create flocks for houses 2 and 3 named 2009-06-05 HOUSE2 and 2009-06-05 HOUSE3.
Finally, create another flock called 2009-06-05 FARM, which will be used for watching of all the houses together. Use same Start date and Initial day, but add all files HOUSE1, HOUSE2 and HOUSE3 to the flock. The dialog should look like this:
We have defined all flocks on the farm and all of them are shown in the Current flocks table:
Adding a standard growth curve to the flocks
Standard growth curve contains target weights for individual days of age of the weighed birds. Weighing results of a flock can be easily compared to the standard curve, so you immediately know if the birds are too heavy or too light.
For each poultry type you have, one Standard growth curve should be created.
Once the Standard growth curves are set, they can be added to the flocks. Each flock can have one Standard growth curve attached (or 2 standard curves if you differentiate cocks and hens when weighing). If you have only one type of poultry, you will create only one Standard curve, which will be shared by all flocks.
Each Standard growth curve can contain up to 30 points and the target weights are usually not inserted for each day. Instead, only weights for every 5th or 10th day are inserted into the Standard curve. Most growth curves are smooth, so this doesn’t cause any problems.
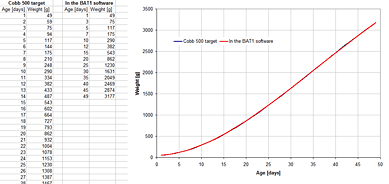
Before the Standard growth curve can be entered into the BAT1 software, it is recommended to compare the growth curve from the poultry supplier with the points you want to enter into the BAT1 software. You can do this in Excel and both curves should not differ too much:
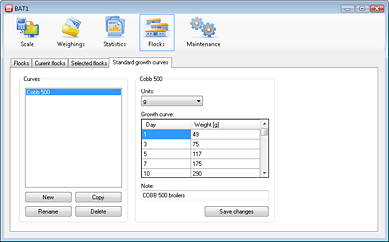
To define the standard growth curve in the BAT1 software select the Standard growth curves tab:
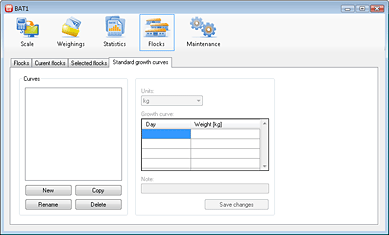
Click the New button and enter the name of the growth curve, in our example Cobb 500. Fill the table on the right side with up to 30 points and click Save changes. The final curve should look like this:
Now we can attach the Standard growth curve to all flocks. Select the Flocks tab, choose the required flock in the table Current flocks and click the Edit button. Click Show details button in the dialog with the flock’s parameters. The section for entering the growth curves will be displayed. Use the Default/Males field to select the Standard growth curve:
Click OK to save the changes. Similarly, edit all the flocks and add the Standard curve to each of them.
Now all the flocks on the farm are properly defined.
Watching the current flocks
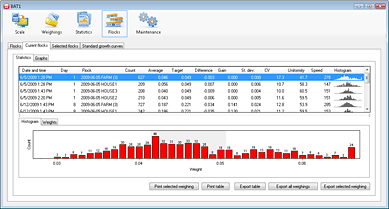
Once the flocks are defined and started, watching their progress is very simple. Just select the Current flocks tab and all weighings of all the current flocks will be automatically shown in a table:
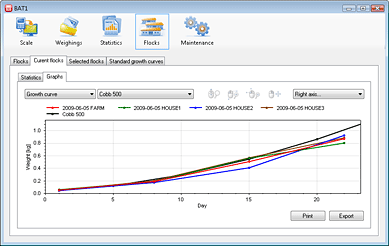
Select the Graphs tab to see the growth curves of all flocks, which can be compared to the Standard growth curve. Also, other types of graphs can be selected:
Every time the data is downloaded from the scale to the PC, the weighed files will be automatically included into the flocks according to the definition. You don’t need to add each weighing to the flock manually.
Flock end
When a flock ends on the farm, you have to close it also in the BAT1 software. Closed flock will be removed from Current flocks and will be placed in Closed flocks.
To close a flock, click the Flocks tab. In the Current flocks table, select the flock you want to close and click the Close button. Enter the flock ending date in the following dialog. The flock will no longer be monitored and it will be moved to the Closed flocks table:
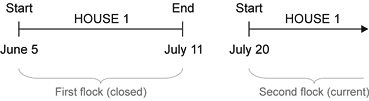
If the flock 2009-06-05 HOUSE1 from the example above will be ended on July 11, 2009, it will contain all weighings of file HOUSE1 from the flock start (June 5) to the flock end (July 11):

Closed flocks can be still shown in the statistics table or graphs using the Selected flocks tab.
When another flock comes to the first house, new flock will be created also in the BAT1 software. The new flock will monitor file HOUSE1 from the start date of the new flock: